
When the temperatures drop and riding season ends, your pets and plants aren’t the only ones who need to come inside. Motorcycle riders of all experience levels ride less often during the winter months, and many of them put their ride away for the season, only to find it in worse shape when they take it back out in spring. If you want to avoid costly springtime repairs and ensure your motorcycle starts smoothly after months of storage, make sure you take time to properly winterize your motorcycle before you put it away.
Luckily, winterizing isn’t that complicated of a process. In this comprehensive article, we’ll go over each essential step to help you prepare your motorcycle for long-term storage, whether during the winter months or for any other extended period. Following these steps will protect your investment and ensure your bike is ready to ride when warm weather returns.
Why Winterizing Your Motorcycle Matters
Proper winterization protects your motorcycle from several common storage-related problems, including fuel system degradation, battery discharge, corrosion, tire flat spots, and moisture damage. Without proper preparation, you might face expensive repairs, difficult starting issues, or even permanent damage to critical components. Taking a few hours to winterize correctly can save you hundreds or thousands of dollars in repairs and frustration when riding season returns.
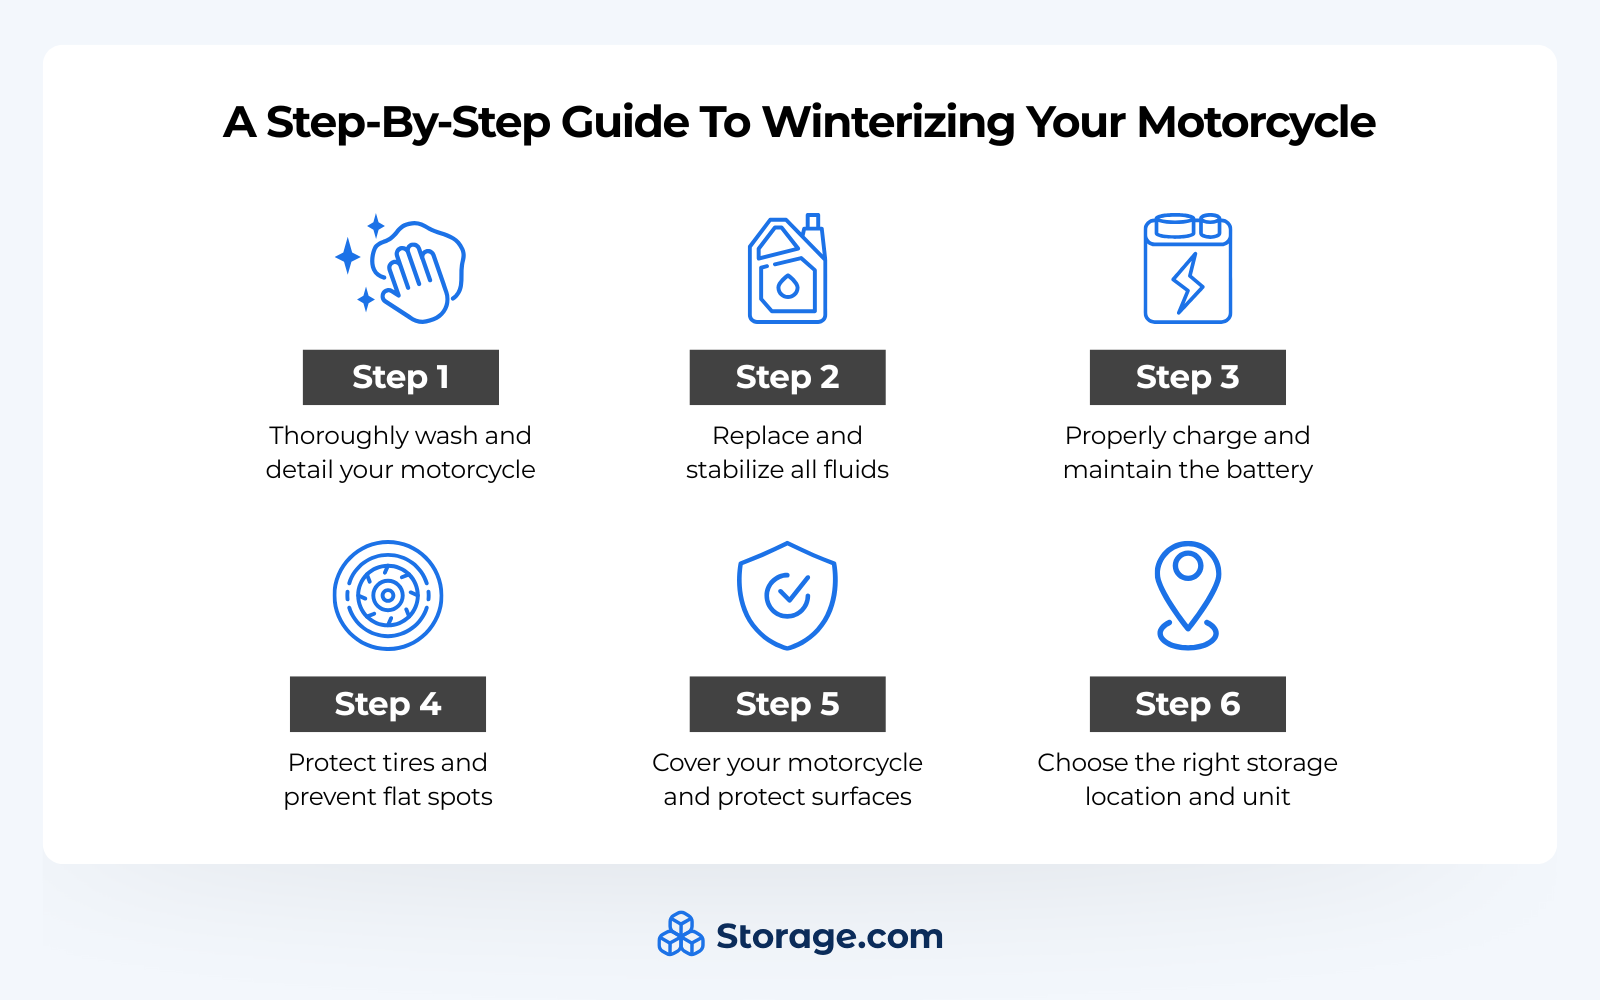
Step 1: Thoroughly Wash and Detail Your Motorcycle
Putting a bike away while it’s dirty can lead to long-term stains, rust formation, and caked dirt that takes forever to remove come spring. Road grime, salt residue, and bug splatter contain chemicals and moisture that can corrode metal surfaces and degrade finishes during extended storage periods.
How to properly wash your motorcycle before storage:
Start by giving your motorcycle a thorough wash using motorcycle-specific cleaning products. Avoid household cleaners or dish soap, which can strip protective coatings. Wash each part thoroughly, paying special attention to the chain, wheels, undercarriage, and any areas where dirt accumulates. Rinse well to remove all soap residue, then dry everything completely using microfiber towels or a leaf blower to eliminate moisture from hard-to-reach areas.
Don’t forget to clean your chain and apply fresh lubricant after drying. This prevents rust formation and ensures your chain is protected during storage. Inspect your motorcycle during this process for any damage or wear that should be addressed before storage or noted for spring maintenance.
Step 2: Replace and Stabilize All Fluids
If you don’t use your bike for a long period, the fluids within can degrade and damage internal systems over time. Old oil contains contaminants and acids that can corrode engine components, while moisture in brake fluid can cause corrosion in brake lines and calipers.
Complete fluid maintenance checklist:
Make sure you get an oil change and service before storage, using fresh oil and a new filter. This ensures your engine sits with clean oil rather than contaminated fluid that can cause corrosion. Replace the brake fluid and antifreeze as well to keep brakes from locking up and cooling systems from freezing or corroding during cold weather.
Fuel system protection is critical. Old gasoline can break down in as little as 30 days, forming varnish and gum deposits that clog fuel injectors, carburetors, and fuel lines. To prevent this, add a high-quality fuel stabilizer to your motorcycle fuel tank following the manufacturer’s recommended ratio. Fill your tank to minimize condensation buildup, which occurs when air space in the tank allows moisture to accumulate.
After adding stabilizer, run the engine for five to ten minutes to ensure the treated fuel circulates through the entire fuel system. This protects fuel lines, injectors, and the fuel pump from corrosion. If you have a carbureted motorcycle, switch off the gas petcock and run the engine until the carburetor is completely drained of gas to prevent varnish buildup in the carburetor jets and passages.
Step 3: Properly Charge and Maintain the Battery
As with any vehicle, a motorcycle battery will lose its charge over time through a process called self-discharge. In cold temperatures, this process accelerates, and a deeply discharged battery can freeze, causing permanent damage and requiring replacement.
Battery maintenance best practices:
Make sure the battery is freshly charged before storage using a quality battery charger. If you have access to power inside the storage unit you’re renting, strongly consider using a battery tender or trickle charger to maintain optimal charge over the long term. These devices monitor battery voltage and provide small charging currents as needed, preventing discharge without overcharging.
If you don’t have power in your unit or you’d rather not use a tender, disconnect the negative battery cable before storage to prevent parasitic drain from your motorcycle’s electrical system. Some riders prefer to remove the battery entirely and store it in a warmer location with periodic charging.
For conventional (non-sealed) batteries, make sure you top up the cells with distilled water to the proper level before storage. Apply dielectric grease to the terminals to keep them from corroding during storage and ensure good electrical connections when you reconnect everything in the spring.
Pro tip: Label which cable goes to which terminal before disconnecting to make spring reconnection easier.
Step 4: Protect Tires and Prevent Flat Spots
Motorcycle tires can develop flat spots when sitting in one position for months, especially in cold conditions. These flat spots may be temporary or permanent depending on storage duration and conditions.
Tire protection strategies:
Inflate your tires to the manufacturer’s recommended pressure or slightly above to help resist flat spotting. If possible, place your motorcycle on a center stand or paddock stands to lift both wheels off the ground, which completely prevents flat spots. If stands aren’t available, try to move or rotate your motorcycle slightly every few weeks during storage if you have access to it.
Consider placing cardboard or foam padding under the tires if they must rest on concrete, as concrete can draw moisture from rubber over time.
Step 5: Cover Your Motorcycle and Protect Surfaces
Even the most secure, airtight, climate-controlled storage units may let in a little dust, dirt, and moisture from time to time. Environmental factors like humidity changes, temperature fluctuations, and settling dust can affect your motorcycle’s finish and components.
Comprehensive coverage and protection:
Get a high-quality, breathable, snug-fitting motorcycle cover and keep it on your bike during storage. Avoid plastic tarps or non-breathable covers, which can trap moisture and promote corrosion. Make sure the cover fits properly and covers your muffler openings to keep condensation out of your exhaust pipes, which can cause internal rust.
For additional protection, apply silicone spray to external engine parts, chrome surfaces, and metal components to create a moisture barrier. Treat rubber parts including grips, footpegs, and seals with rubber conditioner to prevent drying and cracking. You can also protect your engine by wiping it down with a clean cloth and a light coating of WD-40 or corrosion inhibitor spray to create a protective barrier against moisture.
Don’t forget to stuff clean rags or steel wool (for mice deterrent) into your exhaust pipes and air intake if your cover doesn’t seal these areas completely.
Step 6: Choose the Right Storage Location and Unit
You’ve washed your motorcycle, replenished the fluids, taken care of the battery, protected the tires, and obtained a good cover—now you just have to pick the right storage location to keep it in. Where and how you store your motorcycle is just as important as how you prepare it.
What to look for in motorcycle storage:
Look for a storage facility with robust security features, including gated access, surveillance cameras, individual unit alarms, and on-site management. Motorcycles are prime targets for thieves, so security should be your top priority. Consider investing in a climate-controlled unit to further protect your bike from environmental damage, extreme temperature swings, and humidity that can cause condensation and corrosion.
Indoor storage is always preferable to outdoor storage, even with a cover. If indoor storage isn’t available, ensure your outdoor cover is heavy-duty, weather-resistant, and secured against wind. Add your own security measures like a quality disc lock, chain lock, or motorcycle alarm system for additional theft protection.
Storage unit considerations:
- Size: Ensure adequate space to maneuver and access your motorcycle without bumping it
- Accessibility: Choose a facility with convenient access hours for those occasional winter riding days
- Location: Select a facility reasonably close to home for periodic battery checks or maintenance
- Insurance: Verify your insurance covers storage situations and consider additional coverage if needed
Having trouble finding the right unit to store your bike? Check out Storage.com’s built-in search tool to compare storage facilities near you and filter them by the specific features you need, including climate control, security options, size, and price.
Additional Winterization Tips for Complete Protection
- Pre-storage inspection: Before storing your motorcycle, address any maintenance issues you noticed during the riding season. Fix oil leaks, replace worn brake pads, repair damaged bodywork, and resolve any mechanical problems. Starting spring with a fully maintained motorcycle makes the return to riding much more enjoyable.
- Document your process: Take photos of your motorcycle after winterization and note everything you’ve done. This serves as a helpful reminder in spring about what maintenance was completed and what might still need attention.
- Pest prevention: Mice and other rodents can cause significant damage by nesting in air boxes, chewing wiring, and clogging exhausts. Use steel wool in openings, mothballs around (not on) the bike, or electronic pest deterrents to keep unwanted visitors away.
- Registration and insurance: Check whether you can suspend insurance coverage or file for non-operational status with your DMV to save money during storage months. However, maintain theft coverage even during storage.
Spring De-Winterization: Getting Your Motorcycle Road-Ready
When riding season returns, you’ll need to reverse the winterization process:
- Remove the cover and inspect for any damage or issues that developed during storage
- Reconnect and check the battery, charging if necessary
- Remove any exhaust or intake plugs
- Check tire pressure and inspect for flat spots or damage
- Verify all fluid levels and top off as needed
- Start the engine and let it warm up, checking for leaks or unusual sounds
- Test all controls, lights, and safety features before riding
- Take a short test ride in a safe area to ensure everything operates correctly
Following this complete winterization guide protects your motorcycle investment and ensures countless more miles of enjoyable riding. Proper storage preparation takes just a few hours but prevents weeks of spring repairs and keeps your bike in excellent condition year after year.